

 The new motor you installed 6 months ago is making the kind of noise you only hear in horror movies. So, you purchase and install a replacement motor, hoping that it will not suffer the same fate.
But you're not really sure what killed the original motor. The best way to determine the cause of the motor's failure is to perform an autopsy on it. This includes cutting the motor bearings to see what happened to them.
Determining the cause of bearing failure can inform decisions on how to prevent such failures in the future and increase the reliability of VFD-driven motor systems. Cutting and inspecting motor bearings can provide invaluable information about what caused the damage to them. In fact, ANSI/EASA AR100-2015 recommends cutting and inspecting the bearings for evidence of EDM discharges whenever a VFD-driven motor is being repaired.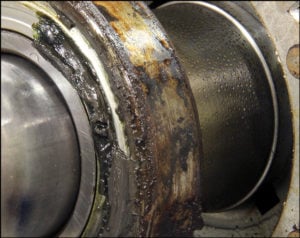
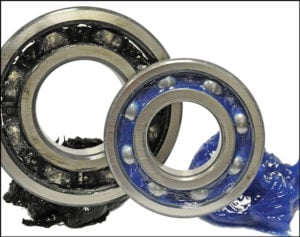
- Start by inspecting both bearings — inside and outside — for contamination, signs of excessive heat, hardening of grease, color of grease (look for abnormal coloration, e.g., blackened grease), and excess grease or oil escaping the bearing. Remember to save a sample of the lubricant for analysis.
- Then, after removing the seals or shields, cut the outer race in half. Follow all established safety precautions and use personal protective equipment including eye protection, hearing protection, a face shield, gloves, and protective clothing.

- Inspect the grease and look for any contamination in the bearing. Burnt grease is typically a sign of continuous electrical arcing in the bearings that heats the oil component of the grease beyond its temperature capacity, causes rapid deterioration of the grease's lubricating capability, and results in bearing race damage. Arcing also loosens small particles of metal from the ball bearings and bearing races. These particles are abrasive and will cause premature wear to bearing surfaces.
- Clean bearing components with a degreaser or solvent.
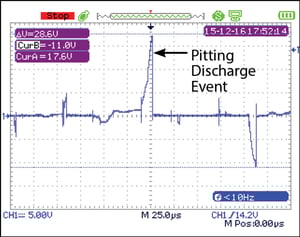
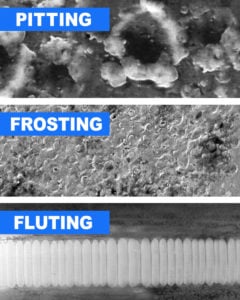
- Inspect bearing components for evidence of electrical discharge machining (EDM). Each time the electrical voltage overcomes the dielectric of the bearing lubrication, it arcs through the inner race and through the rolling elements to the outer race, blasting tiny pits in the bearing surfaces. These pits are typically 5-10 microns in diameter, and can be easily seen under a microscope.
- Look for frosting of bearing surfaces. To the naked eye, frosting appears as a discolored grey line around all or a portion of the inner or outer bearing race. It is actually the result of millions of tiny pits, marring the race surface. Since it can be caused by mechanical wear as well as EDM, discoloration should be examined under a microscope to determine its actual cause. If the motor was controlled by a VFD, there is a high likelihood that the frosting was due to EDM.
- Look for fluting damage. Fluting is a distinctive washboard-like pattern on the inside of the outer bearing race that results from the operational frequency of the VFD. Fluting is visible to the naked eye or can be seen with 10X magnification. Since fluting is sometimes confused with mechanical bearing damage (such as brinelling/false brinelling), careful consideration should be given to electrical fluting when assigning a cause to the bearing damage.
AEGIS Rings also come with a 2-year extended warranty against bearing fluting damage. No other form of protection against VFD-caused bearing damage offers a warranty like this.

To learn more about AEGIS shaft grounding and best practices for electrical bearing protection, sign up for a training. We offer monthly live training webinars, and - pandemic restrictions permitting - we can also visit your facility to review your exact application.
